how to calibrate a canon a1 light meter?
The Canon A1 is a legendary camera that has been used by photographers for decades. One of its key features is its built-in light meter, which helps photographers achieve perfect exposure by measuring the intensity of light and suggesting the correct settings. However, as these cameras age, the light meters may lose their accuracy, making calibration a necessary step to ensure reliable results.
In this guide, we will explain how to calibrate a Canon A1 light meter. By following these steps, you’ll be able to fine-tune your camera’s light meter for optimal performance, ensuring your images are perfectly exposed every time.

Why Calibrate the Canon A1 Light Meter?
Before diving into the calibration process, it’s important to understand why calibration is essential. Over time, the components within a camera can deteriorate. Factors like exposure to heat, moisture, or general wear and tear can affect the light meter’s sensitivity and accuracy.
When the meter becomes inaccurate, it can lead to underexposed or overexposed photos. Calibration is the process of adjusting the meter so that it accurately reads the available light and gives you the correct settings for your camera.
1. Check for Battery Issues
Before attempting to calibrate the Canon A1 light meter, it’s crucial to rule out any battery issues. The Canon A1 relies on a 6V battery to power its light meter. A weak or dying battery can cause the meter to behave erratically, leading to inaccurate readings.
- Step 1: Remove the battery from your Canon A1 and replace it with a fresh, high-quality 6V battery.
- Step 2: Turn on the camera and check the light meter to see if the problem persists.
- Step 3: If the meter still seems off, proceed to calibration.
2. Tools Needed for Calibration
To calibrate your Canon A1 light meter accurately, you will need the following tools:
- A reference light meter (a reliable, modern external light meter or another properly functioning camera).
- A grey card or white surface to serve as a neutral reference point.
- A well-lit area with consistent, even lighting (natural light is ideal).
These tools will help you compare the readings from your Canon A1 to a trusted source and adjust accordingly.
3. Setting the Canon A1 to Manual Mode
The Canon A1 has several shooting modes, but for calibration, we will use manual mode. This will give you complete control over the aperture, shutter speed, and ISO settings, which is necessary for accurate calibration.
- Step 1: Set the mode dial to “M” for manual mode.
- Step 2: Choose a fixed ISO setting, such as ISO 100, which will remain constant throughout the calibration process.
4. Compare Light Meter Readings
Now that your Canon A1 is ready, you will need to compare its light meter reading to that of a reliable external light meter or a properly calibrated camera.
- Step 1: Point both the Canon A1 and the reference meter at the same subject under identical lighting conditions. A neutral subject, like a grey card, is ideal for this comparison.
- Step 2: Set the aperture and shutter speed on the Canon A1 to match those of the reference meter.
- Step 3: Compare the light meter readings. If the Canon A1’s meter shows a different reading, you’ll need to adjust the meter.
5. Adjust the Light Meter
If the Canon A1’s light meter is off, you can make a mental adjustment each time you shoot, or you can have a professional camera technician recalibrate the meter. For small adjustments, however, you can try compensating by manually adjusting the exposure settings in your camera.
- Step 1: If your Canon A1 consistently reads underexposed by a stop, you can adjust by opening up the aperture (for example, from f/5.6 to f/4) or slowing down the shutter speed (from 1/250 to 1/125).
- Step 2: If the meter reads overexposed, do the opposite by closing down the aperture or increasing the shutter speed.
These manual adjustments can serve as a workaround until you get your meter professionally calibrated.
6. Fine-Tuning Exposure Compensation
Another effective way to calibrate your Canon A1 light meter is by using the exposure compensation dial, a feature that allows you to adjust the meter’s reading without changing the actual exposure settings.
- Step 1: Look for the exposure compensation dial on the camera body, usually marked with “+/-”.
- Step 2: If your meter is off by one stop, move the exposure compensation dial to +1 or -1 to correct the reading.
- Step 3: Test the camera again under the same lighting conditions to confirm the adjustment.
This method is particularly useful for making quick adjustments in the field without recalibrating the entire meter.
7. Testing in Different Lighting Conditions
Once you’ve calibrated your Canon A1 light meter, it’s important to test the camera in a variety of lighting situations to ensure consistent accuracy. Take photos in bright daylight, low-light conditions, and with mixed lighting to see if the meter performs as expected.
If the meter consistently reads incorrectly across all lighting conditions, further adjustment or professional repair may be necessary.
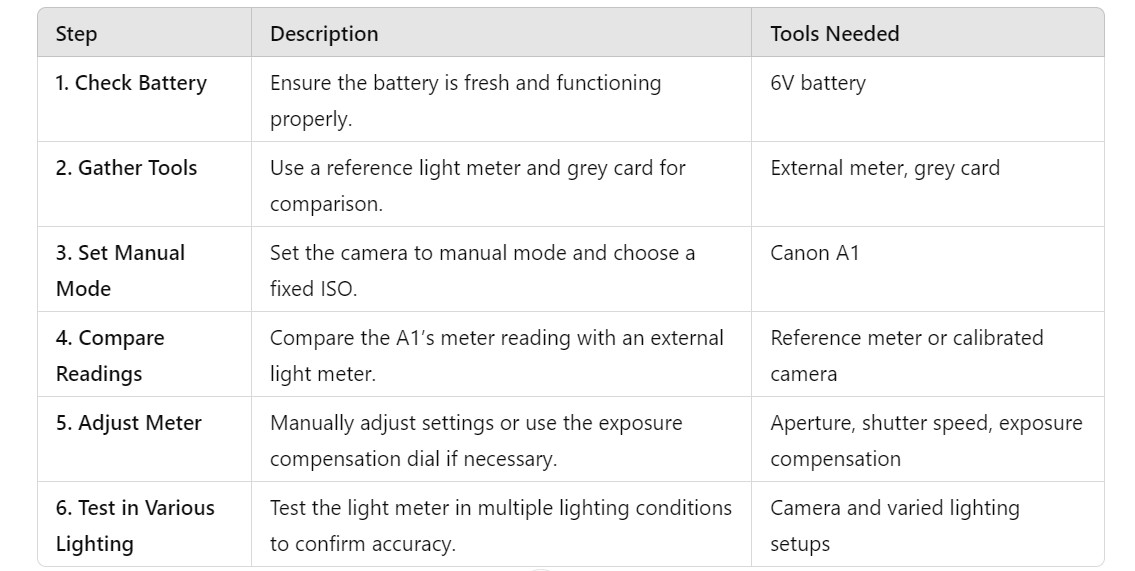
Table: Key Steps for Canon A1 Light Meter Calibration
Conclusion
Calibrating the Canon A1 light meter is essential for achieving precise exposure in your photography. By understanding how to check for battery issues, comparing readings with a reliable light meter, and making manual adjustments, you can ensure your light meter remains accurate. Though small adjustments can be made in the field, for a fully reliable meter, it may be worth seeking professional calibration services. Ultimately, following these steps will give you more control over your Canon A1’s light meter and improve the overall quality of your photography.

FAQs
- How do I know if my Canon A1 light meter needs calibration?
- If your photos are consistently underexposed or overexposed despite correct settings, it’s likely time to calibrate the meter.
- Can I calibrate the light meter myself, or do I need a professional?
- Minor adjustments can be done by yourself, but for accurate calibration, a professional technician may be required.
- Why is my Canon A1’s light meter giving inconsistent readings?
- Inconsistent readings could be due to battery issues, environmental factors, or aging components in the camera.
- How often should I calibrate my Canon A1 light meter?
- Depending on use, you should check the light meter’s accuracy every year or whenever you notice exposure issues.
- What tools are necessary for light meter calibration?
- You’ll need a reference light meter, a grey card, and a reliable light source.
- Can I adjust the Canon A1 light meter using the exposure compensation dial?
- Yes, using the exposure compensation dial is a quick way to adjust for minor inconsistencies in the light meter’s readings.


